Removing a background from a photo or improving an image’s overall quality used to mean desktop software, a steep learning curve, and a significant time investment — options that weren’t realistic for most people working quickly or without design training. In 2026, browser-based AI tools have made both tasks fast, accessible, and genuinely good enough for professional use across a wide range of everyday contexts. The challenge is no longer whether these tools exist — it’s knowing how to choose the right one, use it effectively, and avoid the common mistakes that produce disappointing results even with capable software. This guide covers the features that matter, the tips that improve output quality, and the practical workflows that make online photo editing faster and more consistent.
Why Online Background Removal and Photo Enhancement Have Become Essential Skills
The visual bar for online content has risen sharply. Product images on e-commerce platforms, profile photos on professional networks, graphics for social media, and imagery for email marketing all carry implicit quality expectations that casual, unedited photographs often don’t meet. At the same time, the infrastructure for professional photography — studio access, lighting equipment, post-production retouching services — is out of reach for the majority of individuals and small businesses producing this kind of content regularly.
Browser-based background removal and photo enhancement tools address this gap directly. They don’t replicate the full capability of professional production, but they close enough of the distance that the output is appropriate for most digital publishing contexts. A product photographed on a kitchen counter can become a clean, white-background image suitable for an online store listing. A headshot taken with a phone camera in natural light can become a polished, profile-ready photograph. The key is understanding what these tools do well, where they reach their limits, and how to get the most out of them within those limits.
For anyone managing their own visual content — whether that’s a solo entrepreneur, a content creator, a job seeker updating professional materials, or a small team producing marketing assets — knowing how to use these tools effectively is now a practical skill with direct, visible applications.
What to Look for in a Browser-Based Photo Editing Tool
Not every online photo editor delivers equally on background removal and image enhancement. Before committing time to learning any particular platform, evaluating a few key criteria will help identify tools that will actually hold up under regular use.
Core features that define capable tools in this category:
- Edge detection quality: How accurately the AI separates the subject from the background along complex edges — hair strands, fabric texture, fine structural detail
- Manual refinement controls: Whether the tool provides a brush or eraser for correcting areas the AI handled imperfectly, without requiring a full restart
- Image enhancement capabilities: Whether the tool offers resolution upscaling, color correction, sharpness improvement, and exposure adjustment alongside background removal
- Export format options: Whether PNG (for transparent backgrounds), JPEG, and WebP are all available, and whether full-resolution export is accessible on the free tier
- Workflow integration: Whether background removal and enhancement exist in the same editing environment, or whether completing both tasks requires moving between separate applications
- Watermark policy: Whether free-tier exports carry watermarks — a critical factor for any professional or commercial use
Evaluating a tool against these criteria before starting a project prevents the frustration of discovering a significant limitation after investing time in editing work.
10 Tips for Getting Better Results from Online Background Removal and Photo Enhancement
Tip 1: Start with the Highest Quality Source Image Available
Every editing operation — background removal, resolution enhancement, color correction — performs better on a higher-quality source image. This isn’t about having professional photography equipment; it’s about giving the AI the clearest possible information to work with. A sharp, well-lit image with reasonable contrast between the subject and background will produce a cleaner background removal than a blurry, low-light image with a subject that visually blends into the surroundings.
Before uploading any image for editing, assess the source file quickly against three basic criteria: Is the subject clearly distinguishable from the background? Is the image sharp at 100% zoom? Is the lighting even, without strong shadows crossing the subject boundary? Images that meet these criteria don’t need to be studio-quality — a photo taken in good natural light near a window, with a reasonably uncluttered background, is sufficient for most tool performance.
If the source image has obvious problems — heavy compression artifacts, significant blur, or very low resolution — address what can be fixed before uploading rather than relying on the editing tool to compensate. Increasing the brightness slightly on an underexposed image before upload, for example, can improve edge detection performance by making tonal contrast between subject and background clearer.
Tip 2: Use the Manual Refinement Brush for Complex Edges
AI background removal handles clean, high-contrast edges very reliably, but complex edge cases — layered hair, fabric with fine texture, transparent or semi-transparent elements — almost always benefit from some degree of manual correction. The difference between a professional-looking cutout and one that reads as AI-generated is usually visible precisely at these complex edges, where automated detection either takes too much away or leaves remnants of the original background.
Most capable browser-based background removal tools include a refinement brush that lets users paint back areas that were incorrectly removed or erase areas that should have been removed. Learning to use this tool efficiently — working at a zoomed-in view, using a small brush size for detail areas, stepping back to the full view to check the overall result — takes only a small amount of practice before it becomes a fast, reliable part of the workflow.
The practical approach is to run the automated removal, zoom in to check the subject boundary at actual size, identify any problem areas (typically the hairline, around clothing edges where color is similar to the background, and at partially transparent elements), and use the refinement brush to correct those specific areas. For most standard portrait and product images, this step adds less than two minutes to the workflow and makes a significant difference in the quality of the final output.
Tip 3: Choose the Right Background Replacement for the Use Case
Once a background has been removed, the replacement choice determines much of the final image’s purpose and effectiveness. Different contexts call for different background treatments, and choosing the right one for the specific use case will produce more useful output than applying a generic default.
Background replacement guide by use case:
- E-commerce product listings: Pure white (#FFFFFF) or very light gray is the standard for most major platforms — it meets marketplace requirements and creates visual consistency across product catalogs
- Professional headshots: Soft, neutral solid colors (light gray, warm off-white, muted blue-gray) photograph naturally and adapt well to different publishing contexts
- Social media graphics: Brand-consistent colors, gradients, or thematic background imagery that complements the subject and fits the platform’s visual conventions
- Presentation slides: Transparent PNG export so the subject can be placed directly onto slide backgrounds without carrying a color box
- Marketing and advertising materials: Contextually appropriate imagery that places the subject in a setting relevant to the product or service being promoted
Understanding which output type a project requires before starting the editing session prevents the common issue of completing a background removal and then realizing the replacement approach needed to be different from the start.
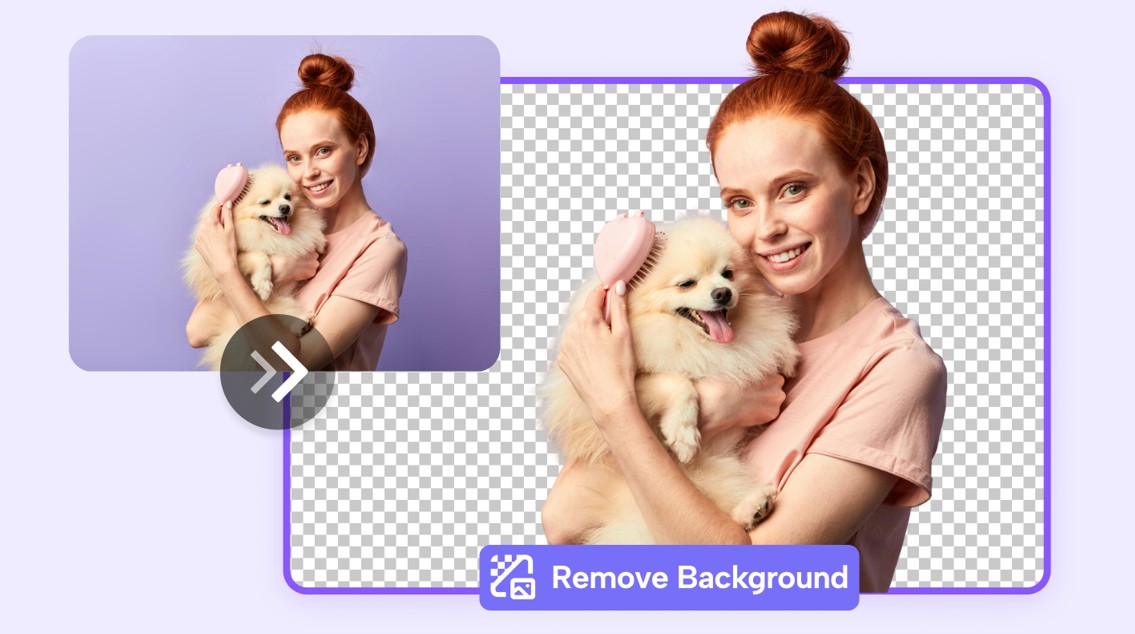
Tip 4: Use Adobe Express for Enhancement and Background Removal in One Workflow
One of the practical frustrations of using multiple single-purpose tools is the file management overhead: download from one tool, upload to the next, check the output, download again. For users who need both background removal and image enhancement in the same project, working within a platform that handles both operations in a single environment eliminates that friction entirely.
Adobe Express combines background removal, image enhancement, and a full design workspace in one browser-based platform. Its AI tools draw on the same technology foundation as Adobe’s professional desktop products, which is reflected in the edge detection quality on complex subjects and the detail preservation in its enhancement processing. For users looking for a photo enhancer free tool that integrates with background removal and broader design work, Adobe Express provides all of these within the same workspace session.
The practical workflow benefit is meaningful: an image can be uploaded, enhanced for resolution and color quality, background-removed, placed into a template layout with typography and brand elements, and exported at platform-specific dimensions — all without leaving the editing environment or managing intermediate downloaded files. For users who produce visual content regularly, this consolidation has real time value that compounds across multiple projects.
Tip 5: Correct Color and Tone Before Removing the Background
The sequence of editing operations matters more than it might seem. Applying color correction and tonal adjustments before running background removal produces better results than doing it in reverse, because a well-corrected image typically has stronger contrast between the subject and background — which improves the AI’s edge detection accuracy.
Specifically, adjusting the white balance to remove unwanted color cast, lifting the overall brightness slightly on underexposed images, and increasing contrast on flat-looking images all tend to make the subject-background boundary cleaner and more visually distinct. This gives the background removal algorithm more reliable tonal information to work with, reducing the number of edge errors that require manual correction afterward.
This principle applies with particular force to images captured in mixed or artificial lighting, where color cast is common and where the subject and background may share similar color temperatures that reduce the contrast available for edge detection. A quick white balance and brightness adjustment before background removal can noticeably reduce the refinement work required after the automated process runs.
Tip 6: Understand the Difference Between Upscaling and True Resolution Recovery
AI resolution enhancement tools are powerful and genuinely useful, but it’s important to understand what they actually do in order to use them appropriately. AI upscaling generates estimated pixel data based on patterns learned from large datasets of image pairs. It does not recover original detail that was never captured — it creates a plausible, higher-resolution version of the information that exists in the source file.
This distinction matters for setting expectations. An image that is slightly below the resolution threshold for a particular use case — a product image that’s adequate for email but too small for a web banner, for example — can typically be upscaled to meet that threshold with results that are visually clean and appropriate for the context. An image that is fundamentally low quality — heavily compressed, significantly blurry, or captured at very low resolution in poor lighting — will improve with AI enhancement but may not reach the quality standard of a natively high-resolution image.
The practical guidance is to use resolution enhancement for images that are close to adequate and need a modest quality boost, rather than as a wholesale rescue operation for images with fundamental quality problems. This approach produces reliable, consistent results and avoids the disappointment of expecting enhancement to compensate for source material that doesn’t have enough information to work with.
Tip 7: Export in the Right File Format for Each Use Case
Export format is a practical decision that directly affects how a finished image can be used after editing, and choosing the wrong format creates problems that can require going back to re-export. The three formats relevant to most browser-based photo editing workflows each serve a different purpose.
Export format decision guide:
- PNG: Use for any image where background transparency needs to be preserved — product images with removed backgrounds, graphic elements for design work, any image that will be placed on top of another background in a subsequent application. PNG is lossless, meaning image quality is not degraded by compression, making it appropriate for images that will be edited further after export.
- JPEG: Use for photographic images with replaced backgrounds where transparency is not needed and file size matters — web pages, social media uploads, email. JPEG compresses well and produces smaller files than PNG, but introduces compression artifacts at high compression settings and does not support transparency.
- WebP: Use for web publishing where both file size efficiency and quality matter. WebP supports transparency and produces smaller files than both PNG and JPEG at comparable quality levels, making it the optimal format for most web-display contexts where the publishing platform supports it.
Confirming the export format matches the intended use case before downloading takes seconds and prevents the common issue of discovering a missing transparent background after using the image in a design project.
Tip 8: Use Portrait Retouching Tools Conservatively
Automated portrait retouching — skin smoothing, blemish reduction, eye enhancement — is available in many browser-based photo editing tools and can meaningfully improve casual photographs for professional use. The risk is over-application: heavy automated skin smoothing removes texture and produces an artificial, digitally processed appearance that many viewers find less trustworthy than a natural photograph, particularly in professional contexts.
Most tools that include portrait retouching provide intensity sliders that control how aggressively each adjustment is applied. The default settings on these sliders are frequently stronger than most users would choose if they were adjusting manually, because they’re calibrated to demonstrate the capability of the feature rather than optimize for natural-looking output.
The practical approach is to apply portrait retouching at a lower intensity than the default — typically 30–50% of maximum — and evaluate the result against the original image at a comfortable viewing distance rather than zoomed in. What looks imperceptible from normal viewing distance is usually the right level of adjustment for professional use. A subtle improvement in skin tone evenness and a modest reduction in the most distracting blemishes typically produces the best balance between improved quality and natural appearance.
Tip 9: Build a Consistent Processing Workflow for Repeated Tasks
For users who regularly edit photos of the same type — product images on a consistent background, team headshots at the same company, social media graphics for a recurring content series — developing a consistent, documented processing workflow produces better results and significantly faster output than approaching each image as a fresh creative problem.
A consistent workflow for product photography, for example, might be: upload raw image, apply auto color correction, adjust white balance to neutral, run background removal, apply white background replacement, check edges with refinement brush, export as PNG at maximum resolution. Documenting this sequence — even as a simple numbered list — means it can be repeated accurately across multiple images and multiple sessions without needing to reconstruct the approach each time.
Consistency in processing also produces visual coherence across a set of images, which is particularly valuable for e-commerce catalogs, team directories, and social media grids where images are viewed together. When all images in a set receive identical treatment, the visual uniformity signals professionalism and attention to quality in a way that individually processed images with varying approaches often don’t achieve.
Tip 10: Check Outputs at Multiple Display Sizes Before Publishing
Browser-based editing environments typically display images at a comfortable working size that may not reflect how they’ll actually appear in their intended context. An edge refinement issue that’s invisible at the editing view may be immediately obvious when the image is displayed as a small thumbnail on a product listing page. Conversely, a slight color balance issue that seemed significant in the editor may be imperceptible in the context of a finished page layout.
Before finalizing any image for publication, check it at two or three different display sizes that reflect its actual use context. For a product image that will appear as a small thumbnail in a search listing and a larger view on the product page, check it at both sizes. For a social media graphic, view it at the dimensions it will actually appear on the platform — mobile display sizes are often significantly different from desktop, and they’re where most social media content is actually consumed.
This takes less than a minute and prevents the frustrating experience of publishing an image and only then noticing a visible processing artifact or quality issue. Many browser-based tools include a preview mode that simulates different display contexts — using this before export is a simple, low-effort quality check.
FAQ: Online Background Removal and Photo Enhancement Tools
Q1: How good is AI background removal for professional or commercial use?
AI background removal has improved substantially and, for many use cases, produces results that are appropriate for professional and commercial contexts without manual correction. The key variables are the complexity of the subject’s edges and the contrast between the subject and the original background. Clean-edged subjects — product boxes, simple objects, people in solid-colored clothing against a distinct background — typically produce cutout results that require no manual refinement and meet commercial quality standards. Complex edge cases — detailed hair, fur, translucent fabric, or subjects photographed against backgrounds with similar colors — reliably require some manual refinement but can still reach professional quality with a moderate amount of correction work. The practical bar for commercial use on major e-commerce platforms, professional directories, and marketing materials is achievable with current browser-based tools for the majority of standard images, particularly when the refinement brush is used to address edge problem areas.
Q2: Can online photo enhancement tools genuinely improve images for print use?
Browser-based AI enhancement tools can improve the visual quality of digital images in ways that have value for some print applications, but print has more demanding technical requirements than digital display and the appropriate use of enhancement depends on the specific print context. For standard commercial printing — business cards, brochures, standard-size event prints — AI upscaling can bring a slightly below-threshold image to an acceptable resolution, and color correction can address the tonal differences between screen display and CMYK printing. For large-format printing, fine art reproduction, or any context where the print will be viewed at close range and compared against a quality standard, browser-based enhancement tools are unlikely to produce results that meet the requirements without starting from a higher-quality source image. Users with print production requirements should confirm the minimum DPI specifications for their specific print context and verify that their enhanced image meets those specifications before committing to a print job.
Q3: What are the copyright and privacy considerations when uploading photos to browser-based editing tools?
Uploading images to browser-based editing services involves sending files to the service provider’s servers for processing, which raises legitimate questions about privacy, data handling, and terms of use. Reputable platforms publish privacy policies and terms of service that specify how uploaded images are handled — including whether they’re stored beyond the duration of the editing session, whether they’re used for AI model training, and what rights the platform claims over uploaded content. Users should review these terms before uploading images that contain recognizable individuals, proprietary product designs, confidential business materials, or any content with existing intellectual property considerations. For images of recognizable people specifically, it’s worth understanding the platform’s data retention policy, since images stored on external servers are subject to that provider’s security practices and data handling standards. Terms of Service; Didn’t Read (ToS;DR) is a useful starting point — it’s a volunteer-run project that grades and summarizes the privacy policies of hundreds of popular web services in plain language, making it easier to compare platforms before committing to one.
Q4: How much of a quality difference exists between free and paid tiers for these tools?
The quality of the underlying AI processing — edge detection accuracy in background removal, detail preservation in resolution enhancement — is generally consistent between free and paid tiers on reputable platforms. The differences between tiers relate primarily to usage volume, export specifications, and access to additional features rather than to the quality of the core AI operations. Free tiers commonly impose limits on the number of images that can be processed per month, cap export resolution below the maximum available on paid plans, include watermarks on exported images, and restrict access to features like batch processing and premium template libraries. For personal use where processing volume is low and watermarks are acceptable, free tiers are functionally adequate on most platforms. For commercial use — particularly any context where watermark-free export, full-resolution output, or high-volume processing is required — a paid plan is effectively necessary and the cost is typically modest relative to the time value of the workflow efficiency these tools provide.
Q5: What’s the best approach for editing product photos at scale without professional equipment?
Editing product photos at scale without professional photography infrastructure is a realistic workflow for small e-commerce operations, provided a few practical standards are applied consistently to the photography and editing process. On the photography side, the most impactful variables are lighting consistency (natural light from a consistent direction, or an inexpensive continuous lighting kit) and background consistency (a single-color backdrop, even a piece of poster board, dramatically improves background removal accuracy). When source images share consistent lighting and background conditions, AI background removal applies uniformly across the set, reducing the per-image correction work significantly. On the editing side, batch processing capability — available on paid tiers of most major platforms — allows a set of consistently photographed images to receive identical background removal and enhancement treatment in a single operation. Combining consistent photography practices with batch processing produces a scalable product image workflow that small operations can maintain without a dedicated photography or design resource. The investment in developing that consistent approach at the beginning of the process pays back across every subsequent editing session.
Conclusion
Browser-based background removal and photo enhancement tools have become genuinely capable enough to handle the visual content requirements of most individuals, small businesses, and content creators working without professional production resources. The combination of AI-powered automation for standard cases and accessible manual refinement tools for complex ones means that polished, publish-ready images are achievable without design training or expensive software, provided users understand how to work with these tools effectively rather than just what the tools are capable of in ideal conditions.
The tips in this guide — from starting with the highest quality source image possible to building a consistent processing workflow for repeated tasks — are designed to help users get reliable, professional-quality results rather than unpredictable ones. The tools do the heavy lifting; understanding their strengths and limits, and applying a thoughtful workflow around them, is what determines whether the output is consistently good or just occasionally adequate.